
Rainbows: A When, Where, Why

A near horizontal rainbow caused by a high elevation sun.
I’ll never forget the first time I caught a rainbow with my camera. I was fumbling with my gear, staring at the sky in disbelief, knowing the colors would vanish before I could even get set up. If you’ve ever been caught off guard like that, you know the frustration. But here’s the secret: rainbows aren’t random. Once you know the conditions to look for, you can actually anticipate them, sometimes minutes before they appear.
The Basics: What Makes a Rainbow
We will skip the Physics lecture concerning the EM Spectrum and simply think of a rainbow as sunlight playing inside raindrops. Light enters, bends, reflects, and exits in a spectrum of color. That bending sets a fixed angle, about 42 degrees from the opposite side of the sun. This means the very first rule of rainbow chasing is simple: keep the sun at your back. Wherever the rain is falling opposite of direct sunlight, that’s your hunting ground.
Tip: When your shadow is longer than you are tall is a great general idea of when the sun is low enough in the sky for a rainbow to appear.
When to Look
Rainbows live at the edge of storms. The best time is when a shower is clearing and the sun breaks through. Early morning and late afternoon are prime. When the sun is lower, the rainbow sits higher in the sky and becomes visible. If the sun climbs too high (think midday), that magical arc can’t form at all.
Reading the Sky
As a photographer, train yourself to read the sky the way you read light on a subject. If you see shafts of rain ahead while the sun begins to shine at your back, that’s your cue. Watch for darker clouds in the distance; rainbows always pop stronger against a shadowed backdrop. Wide valleys, plains, and lakeshores often give you the space to see a full arc. Sunrise/set rainbows will be at their “tallest” while the apparent height of the rainbow sinks closer to the ground as the sun's elevation increases.
Positioning Yourself
Chasing a rainbow can be as simple as taking ten steps to the left/right. If you notice faint color bands starting, shift your position until you’re lined up with the sunlight and rain. Remember, you’re painting with alignment: sun behind you, rain ahead.
Beyond the Classic Rainbow
Double rainbows, two arcs, appear more often than you might think, especially when sunlight is strong and the rain is heavy. The 2nd rainbow has a maximum angle of 51⁰ with the colors reversed from the primary rainbow. Reflected rainbows over lakes add drama, and if you’re lucky, you might even see a fogbow, ghostly and white in morning mist.
Photographing the Moment
Once the arc reveals itself, speed is everything. Rainbows fade fast. A polarizing filter helps intensify color. A wide-angle lens captures the full curve, while foreground elements, a winding road, a mountain peak, a stand of aspens, turn the rainbow from a spectacle into a story.
Closing Thought
The next time you feel raindrops on your jacket while the sun warms your back, don’t pack up your gear. Get ready. Rainbows aren’t accidents. They’re predictable gifts, waiting for those who know when and where to look.
Furthing your knowledge
Here’s a Veritasium video that'll teach you more than you even wanted to know about rainbows.
What They (Probably) Don't Teach You About Rainbows At School
Continued Reading: Putting Ideas Into Motion
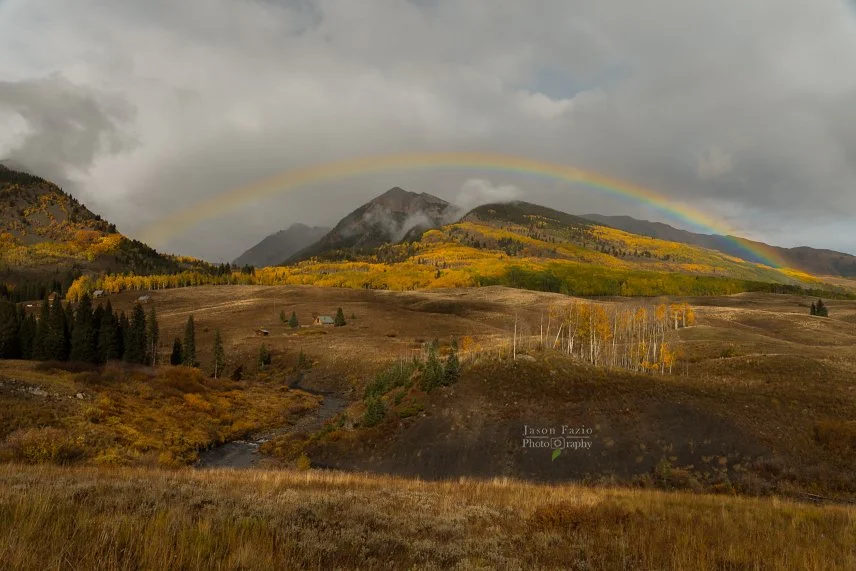
Concerning the image below, I was approaching the Colorado town of Crested Butte; so was a rain storm. I pulled over and simply watched for a few moments. Judging by the direction that the rain seemed to be moving, as well as the position of the sun, it seemed as if I’d be able to capture a rainbow in the vicinity of a neat little composition that I knew of. I quickly sped off in that direction.
When I arrived, there was no light on the terrain at all; it was nothing but gloom and rain. I sat patiently waiting. Before long, the skies began letting a bit of light through. I set up my tripod, anticipating a rainbow. I do not typically shoot this scene in landscape orientation. However, when I saw the rainbow appear, I quickly flipped from portrait orientation to a landscape orientation as I could see both ends of the rainbow. Many times, this is not the case. The rest can be seen below…
Quick Review:
1. The Science Behind Rainbows
Rainbows form when sunlight passes through raindrops, bending (refraction), reflecting inside, then bending again on the way out
They always appear opposite the sun (the “antisolar point”)
Knowing this lets you predict where to look
2. Key Conditions for a Rainbow
Rain + Sunlight at the Same Time:
Light rain or showers with breaks of sun
Clearing storms are perfect - watch the sky as the rain passes and the sun pops out
Low Sun Angle:
Early morning or late afternoon is best
When the sun is too high (above ~42°), no rainbow will appear
Background Matters:
Darker clouds behind the rain enhance visibility
Wide open landscapes (plains, lakes, valleys) give the best chance to see the full arc
3. How to Position Yourself
With sun behind you, look into the opposite sky where rain is falling
Move to align yourself with rain shafts and the sun angle
Sometimes you’ll see a faint rainbow forming and can reposition for a stronger view
4. Special Rainbow Opportunities
Double Rainbows: Caused by double internal reflection in raindrops. They’re rare but more common with bright low-angle light
Reflected Rainbows: Over lakes or wet surfaces
Fogbows / Snowbows: With mist or fine snow - whiter and ghostlike
5. Photography Tips
Use a polarizer - it intensifies the colors
A wide-angle lens helps capture the full arc
Don’t forget foreground interest: mountains, trees, lakes, or a winding road leading to the rainbow
Be quick - rainbows can fade in minutes


